Clear aligner therapy has transformed orthodontics. Patients now have a discreet, comfortable alternative to metal braces — and demand is skyrocketing.
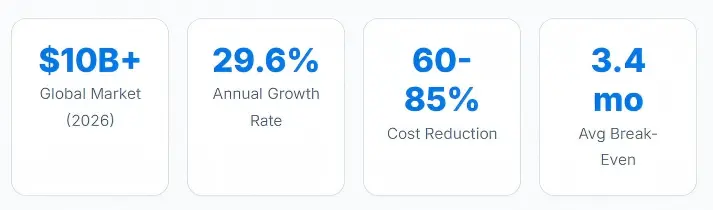
The global clear aligners market surpassed $10 billion in 2026 and is projected to grow at a 29.6% annual rate through 2035.
More dental practices are bringing production in-house. The reasons are clear: greater control, lower costs, and faster treatment timelines.
This guide covers every aspect of launching your in-house clear aligner production. From digital workflows and equipment selection to quality control and ROI calculations — everything you need is here.
Why Move to In-House Production?
Bringing aligner production in-house is a strategic decision. Understanding the advantages helps justify the investment and shape your implementation plan.
1. Faster Turnaround
Produce aligners in days, not weeks. Same-day reprints and mid-treatment adjustments become possible — dramatically improving patient satisfaction.
2.Significant Cost Savings
Once equipment is amortized, per-aligner costs drop substantially. No more recurring lab fees for every patient case.
3.Complete Clinical Control
Direct oversight of every production stage ensures quality meets your exact specifications — no reliance on third-party protocols.
4.Treatment Flexibility
Modify treatment plans in real time. Produce replacement aligners immediately and experiment with staging protocols.
5.Practice Differentiation
In-house manufactured aligners position your practice as a technology leader in digital orthodontics.
6.Better Profit Margins
Eliminate lab fees and markups. Capture the full value of aligner therapy within your practice.
When Does In-House Make Sense?
Practices treating 20-30+ cases monthly see the fastest ROI. Even smaller practices benefit when factoring in additional 3D printing applications like night guards and surgical guides.
The Digital Workflow
In-house production follows a structured digital-to-physical workflow. Each stage must be executed precisely for clinical accuracy and predictable outcomes.
![]()
Step-by-Step Breakdown
![]()
Pro Tip: File Formats Matter
Ensure your intraoral scanner exports in STL, OBJ, or PLY formats for maximum compatibility with treatment planning software and 3D printers.
Essential Equipment
Building an in-house aligner lab requires strategic equipment selection. Total investment typically ranges from $50,000 to $200,000 depending on your throughput needs.
| Equipment | Purpose | Price Range (USD) |
|---|---|---|
| Intraoral Scanner | Digital impression capture | $10K – $20K |
| Treatment Planning Software | Tooth movement planning | $5K – $15K/yr |
| Dental 3D Printer (Resin) | Model fabrication | $3K – $25K |
| Wash & Cure Station | Post-processing models | $500 – $3K |
| Thermoforming Machine | Aligner sheet forming | $5K – $20K |
| Trimming System | Cutting & finishing | $20K – $50K |
| Computer Workstation | Software operation | $1.5K – $3K |
Choosing a Dental 3D Printer
The 3D printer is the most critical piece of equipment in your workflow. For dental applications, resin-based technologies (SLA, DLP, or mSLA/LCD) are preferred over FDM due to superior surface finish.
![]()
Pressure vs Vacuum Forming
Pressure forming at 400 kPa reduces max deviations from 1.06mm to 0.4mm vs vacuum alone. It delivers more consistent material adaptation and better detail reproduction.
Aligner Material Selection
Material selection directly impacts treatment outcomes, patient comfort, and case predictability. The three main options each serve different clinical needs.
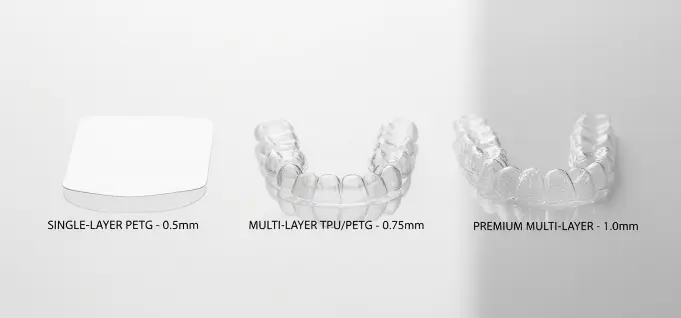
Material Types Compared
| Property | Single-Layer PETG | Multi-Layer TPU/PETG |
|---|---|---|
| Optical Clarity | Excellent | Very Good |
| Force Retention (24h) | ~55-65% | ~70-80% |
| Elasticity | Moderate | High |
| Fracture Resistance | Standard | Superior |
| Patient Comfort | Good | Excellent |
| Cost | Lower | Higher |
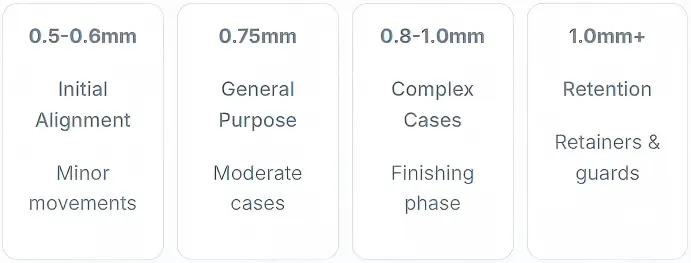
Thickness Guidelines
The Thermoforming Process
Thermoforming transforms your digital plan into a physical aligner. This step directly affects fit, force delivery, and patient comfort.
Critical Parameters
| Parameter | Setting | If Wrong… |
|---|---|---|
| Heating Temp | Follow manufacturer | Thinning or poor adaptation |
| Heating Time | 60-120 seconds | Inconsistent properties |
| Forming Pressure | 300-400 kPa | Poor detail reproduction |
| Cooling | Full passive cooling | Warping & distortion |
| Model Prep | Dry, fully cured | Adaptation error |
9 Best Practices
Common Mistake
Skipping quality inspection is the #1 cause of treatment predictability issues. Labs without formal QC experience 3-5x higher remake rates.
In-House vs Outsourcing
The financial case depends on your monthly volume, equipment choice, and operational efficiency. Here’s the complete picture.
![]()
Startup Investment
| Category | Budget | Professional |
|---|---|---|
| Intraoral Scanner | $10,000 | $15K – $20K |
| 3D Printer & Post-Proc | $5,000 | $15K – $25K |
| Thermoforming Equipment | $8,000 | $15K – $20K |
| Trimming & Finishing | $20,000 | $20K – $50K |
| Software & Computer | $5,000 | $5K – $15K |
| Materials & Training | $5,000 | $8K – $13K |
| Total | ~$55,000 | ~$78K – $143K |
A typical 20-30 aligner case costs $100-$300 in materials vs $800-$2,000+ outsourced. That’s a 60-85% cost reduction per patient.
Quality Control
Consistent quality is non-negotiable. A robust QC system ensures predictable outcomes, reduces remakes, and protects your reputation.
![]()
In-house clear aligner production is one of the most impactful investments a modern dental practice can make.
With the market growing at nearly 30% annually and patient demand at all-time highs, practices that control their own production gain major advantages in cost, speed, quality, and flexibility.
Practices treating 20+ cases monthly typically see ROI within 3-6 months. Success comes from selecting the right equipment, training your team, implementing quality systems, and following a structured plan.
Digital dentistry technology is evolving rapidly. Faster printers, smarter software, and improved materials are making in-house production more accessible than ever. Practices that establish these capabilities now position themselves at the forefront of orthodontic care.
The question is no longer whether in-house production is viable — it’s how quickly you can implement it to capture the benefits for your patients and your bottom line.